|
|
|
Solar Batch & Wood Stove Water Heating |
|
Cost Effective Residential Green Energy |
|
|
|
Tom Schmidt
|
|
3/17/2015 |
|
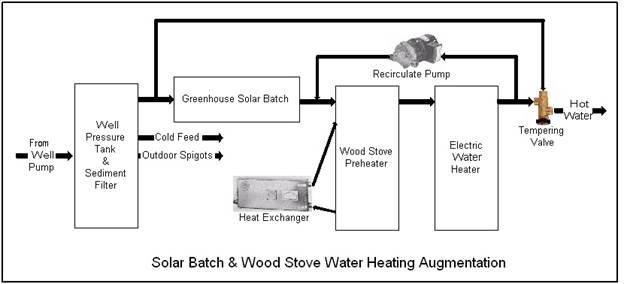
We reduce electricity consumption by using our wood stove and greenhouse solar batch heater to preheat water entering the electric water heater. The system is passive and implemented at low cost resulting in rapid payback. |
Table of Contents
Effects of Elevation on Pressure
Maximizing Winter Energy Capture
System Overview
We have a 55 gallon electric water heater. As a family of 2 we consume on average about 7 kWh per day for hot water. Assuming year round average well water temperature of 50F and water heater setting of 120F that translates to about 40 gallons of hot water per day. Our utility offers a separately metered lower rate for water heating. The 2015 uncontrolled water heating rate is about $.16 per kWh. There is a fixed monthly charge for a separate meter so effective rate varies somewhat depending on usage. Uncontrolled means power can be drawn at any time but must be used solely for water heating. At $.16 per kWh hot water costs $1.12 a day, $409 a year. This sets the bound on how much water the alternative system needs to produce and how much it can cost for a reasonable payback period.
During the summer a solar batch heater, consisting of two 30-gallon tanks in the greenhouse, reduces summer electricity consumption.
The house is heated with a cord wood stove. A heat exchanger in the stove transfer heat to a 30-gallon storage tank reducing winter electricity consumption.
Both solar batch and wood stove act as preheaters to a conventional electric water heater. Using a preheat strategy means the water heater operates normally, without modification. The electric water heater makes up any shortfall. It is bad form running out of hot water when we have guests. The combination of solar and wood complements each other nicely providing year round energy savings.
My primary design goal was low cost and passive operation. Many green energy systems are plagued by too much complexity. I am an electronics engineer by profession but choose to limit the control system to ancillary functions. Except for electricity needed by the well pump the system is passive. There is electronic temperature monitoring and control of the recirculate pump to increase wood stove energy capture but the system is able to function without them.
Water Supply
We live in a rural area and use a well for potable water. Water is high quality but does have a fair amount of sand, which tends to clog faucet aerators and clothes washer inlet screen. A whole house sediment filter is used to remove it. In drawing these pictures I was surprised how many valves are involved but being able to control individual water subsections is very useful.

Well
 Our water
comes from a submersible pump in a drilled well. Submersible pumps are pretty
inaccessible, being at the bottom of the well hole, so it is common practice to
use an electrical control box to remote as many components as possible. The
control box houses the start capacitor and relay. Some more sophisticated
versions include various safety and convenience features. Due to the long distance
between controller and pump it is common practice to operate submersible pumps
from 240v even though typical pump is only ½ horsepower.
Our water
comes from a submersible pump in a drilled well. Submersible pumps are pretty
inaccessible, being at the bottom of the well hole, so it is common practice to
use an electrical control box to remote as many components as possible. The
control box houses the start capacitor and relay. Some more sophisticated
versions include various safety and convenience features. Due to the long distance
between controller and pump it is common practice to operate submersible pumps
from 240v even though typical pump is only ½ horsepower.
Folks with shallow wells are able to use a jet pump. Either way the goal of the pump is to extract water from the well and deliver it to the house under pressure. As water is nearly incompressible there needs to be some way to maintain pressurize when the pump is off.
Pressure Tank
 The well pressure
tank is a clever but simple device that uses air to maintain water pressure
when pump in not running. The tank is precharged with air, as water is added the
air is compressed exerting pressure on the water. It is a little more complex because
if air and water remain in direct contact eventually the water will absorb all the
air causing the tank to become water logged. A membrane keeps the two separate.
If the membrane fails the tank becomes waterlogged and has to be replaced. Tank
sizing is a tradeoff between physical size and limiting how often pump cycles.
The well pressure
tank is a clever but simple device that uses air to maintain water pressure
when pump in not running. The tank is precharged with air, as water is added the
air is compressed exerting pressure on the water. It is a little more complex because
if air and water remain in direct contact eventually the water will absorb all the
air causing the tank to become water logged. A membrane keeps the two separate.
If the membrane fails the tank becomes waterlogged and has to be replaced. Tank
sizing is a tradeoff between physical size and limiting how often pump cycles.
Pressure Switch
 The other
key component is the pressure switch. Typical pressure switch settings for
residential water supply are either 30 – 50 PSI or 40 – 60 PSI. Switch turns
pump on when pressure reaches low threshold and off at high. Our switch has a
safety feature if water pressure becomes extremely low it keeps the pump turned
off. This could be due to running out of water during a power outage, a
pump/control box failure, or a massive leak.
The other
key component is the pressure switch. Typical pressure switch settings for
residential water supply are either 30 – 50 PSI or 40 – 60 PSI. Switch turns
pump on when pressure reaches low threshold and off at high. Our switch has a
safety feature if water pressure becomes extremely low it keeps the pump turned
off. This could be due to running out of water during a power outage, a
pump/control box failure, or a massive leak.
 Pressure Tank Tee
There are a lot of devices connected at the pressure tank so a special fitting called a pressure tank tee is used. Water from the pump enters from either the left or right, and exits to the house on the opposite side. The tee is plumbed into the pressure tank so when pump is on water flows into the tank and as water is drawn with the pump is off air in the tank maintains pressure.
The pressure switch and pressure gauge are connected to small ¼” tapings on the top of the Tee. Coming out the front in the picture is a pressure relief valve and a drain valve to allow draining the system. A check valve at the pump keeps water from flowing back down the well when the pump is not running.
Municipal Water
Getting water from the town rather than your own well simplifies residential plumbing but introduces some additional water heating considerations. Back when I was growing up, many years ago, water was simply piped into homes through a water meter that measured usage.
There are two downsides to this method, residential water pressure is the same as the water mains and under certain conditions it is possible for contaminated water in the building to be pulled back into the municipal supply. To address these concerns current best practice fits a pressure regulator and back flow preventer where water enters the house. The pressure regulator allows the water company to operate their mains at higher pressure, good for the fire department and allows increased water volume through a given size pipe. This is analogous to electric utilities using high voltage transmission lines and then stepping the voltage down to deliver power to individual customers. The back flow preventer is a check valve that closes if pressure in the home is higher than the supply preventing water already in the house from flowing out. This can occurs if there is a nearby fire and the fire department is using a lot of water.
Expansion Tank
 So what does
all this mean for hot water? Water volume increases slightly with temperature.
With a well or old fashion municipal water system no one noticed because there
was a lot of room for the heated water to expand into. However with a modern
municipal system water is no longer allowed to expand back into the supply.
The result is that even a small increase in volume results in a significant
increase in pressure, causing the hot water tank pressure temperature relief
valve (PTRV) to open.
So what does
all this mean for hot water? Water volume increases slightly with temperature.
With a well or old fashion municipal water system no one noticed because there
was a lot of room for the heated water to expand into. However with a modern
municipal system water is no longer allowed to expand back into the supply.
The result is that even a small increase in volume results in a significant
increase in pressure, causing the hot water tank pressure temperature relief
valve (PTRV) to open.
The solution is to install a small expansion tank to provide space for the water as it expands. This acts much like the pressure tank used with a well but it is not there to maintain pressure but rather to relieve over pressure due to thermal expansion.
Effects of Elevation on Pressure
We are all familiar with municipal water towers that dot the landscape. Water towers use the force of gravity to provide pressure. Once water is pumped into the tank gravity provides the pressure. What is less obvious is gravity has the same effect on residential water systems but in the opposite direction. Each foot of elevation adds or subtracts .433 PSI. In the case of a water tower each foot of additional height increases pressure by .433 PSI. At home height has the opposite effect. The higher the water has to go the less pressure it has. If we assume a typical home with 8 foot ceilings and pressure switch located in the basement a second floor shower is about 23 feet above the switch, reducing pressure by 10 psi (23 x .433).
Well pressure switches allow the cut in and cut out pressure to be adjusted to fine tune the system. I tweaked the cut in pressure a little to compensate for this effect.
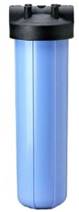
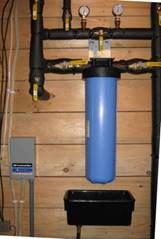
Whole House Sediment Filter
 Our water
quality is excellent but we tend to have a lot of sand. This is a nuisance as
it clogs faucet aerators and the washing machine filter. It is sobering to see
just how much sand is involved by looking into the toilet tank and seeing a virtual
beach. Sand is abrasive so it tends to shorten the life of water appliances.
The solution was to install a whole house sediment filter.
Our water
quality is excellent but we tend to have a lot of sand. This is a nuisance as
it clogs faucet aerators and the washing machine filter. It is sobering to see
just how much sand is involved by looking into the toilet tank and seeing a virtual
beach. Sand is abrasive so it tends to shorten the life of water appliances.
The solution was to install a whole house sediment filter.
There are many companies making filter elements and housing. Luckily there are industry standard sizes giving buyers a lot of flexibility to mix and match. Standard filter elements are 10” or 20” in length and 2.5 or 4.5” in diameter. The larger the filter the longer it will last and all else being equal result in lower operating cost. I installed the largest housing I could find, commonly called Big Blue, which accepts a 4.5” x 20” filter element.
Filter Element
 Being on a
well constrains filter element choice because water is not chlorinated so need
to use material that does not support bacterial growth. I chose a Pentek
DGD-5005-20 polypropylene dual-gradient filter. The outer section is rated
at 50 microns and the inner at 5. This gives the filter the ability to hold a
lot of sediment with low pressure drop. The other versions of this filter are
75/25 and 25/1. I picked the one in the middle to have the option to go up or
down if it didn’t work out.
Being on a
well constrains filter element choice because water is not chlorinated so need
to use material that does not support bacterial growth. I chose a Pentek
DGD-5005-20 polypropylene dual-gradient filter. The outer section is rated
at 50 microns and the inner at 5. This gives the filter the ability to hold a
lot of sediment with low pressure drop. The other versions of this filter are
75/25 and 25/1. I picked the one in the middle to have the option to go up or
down if it didn’t work out.
I replaced the filter after 12-months; pressure drop was still low but wanted to examine the element. As expected there was a fair amount of sand in the sump and the element captured a lot of finer silt particles. The effects have been dramatic, in checking aerators not a sand particle to be found.
I bought the filter housing, accessories, and filter elements from Waterfilters.net. They have a bunch of videos about filter technology. While some of it is a bit hokey (the doctor metaphor) I found them a valuable source of information.
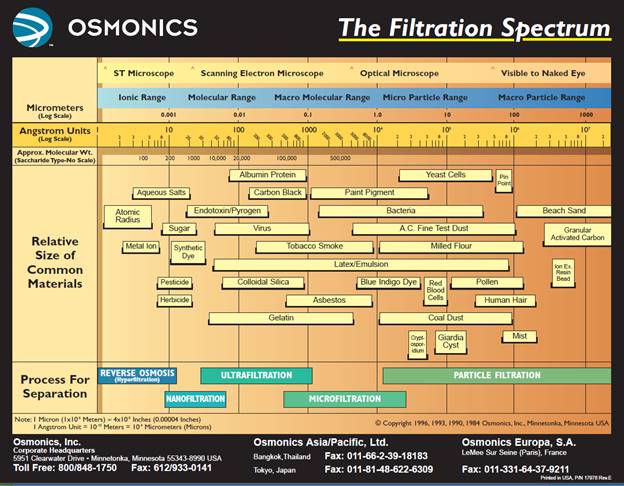
Filtration Spectrum
Learning about water filtration can be daunting. I tried to abide by the KISS (keep it simple stupid) principle. We have had our water tested numerous times and water quality always comes back fine. That constrained the problem to sediment so the issue was how small a particle I wanted to remove.
Water Distribution
Water enters the basement where the pump electrical control box, pressure tank and sediment filter are located. The house has two frost free hose bibs and a couple of spigots located in the yard and out building. Outside water does not run through the filter and each can be turned off and drained independently. When we built the house I used ball valves with a built in drain port. This worked but had to use a wrench to unscrew the drain cap and connect a small hose to capture water when draining the line. When I replaced the pressure tank and added the sediment filter changed to ball valves without a drain and added ¼ turn boiler drain to each line. This way to drain the line for winter: turn off the water, connect the hose and open the boiler drain. No tools required. The larger opening makes draining quicker in addition to being more convenient.
Valves at each end of the filter are used to turn water off when the element needs to be changed. If for any reason there is a problem with the filter a bypass valve can be opened bypassing the filter housing. To facilitate filter management two pressure gauges, one on each side of the bypass valve indicate pressure drop through the filter. The pressure switch is 30-50 PSI so I used 0-60 lbs. gauges rather than the more common 0-100.
The filter housing has a pressure relief button that dumps water pressure before unscrewing the sump to change the element. I located a small pan under the filter with a drain hose. The hose can be unscrewed and used to capture water when the outside spigots are drained for winter.
Three shutoff valves control in home water: hot, cold, and icemaker. I’m not a fan of puncture type saddle valves typically used with icemakers. I installed a ½” ball valve and reducer to connect ¼” flexible tubing to the icemaker.
Three ball valves and two hose bibs control and drain the greenhouse batch solar heater.
Condensation Control
 Pressure tank
and sediment filter are located in the basement. Cold well water causes condensation
on the pressure tank and filter housing. When I installed the system though I
was being clever and decided to use the sediment filter as a poor man’s
dehumidifier.
Pressure tank
and sediment filter are located in the basement. Cold well water causes condensation
on the pressure tank and filter housing. When I installed the system though I
was being clever and decided to use the sediment filter as a poor man’s
dehumidifier.
The bucket mounted under the filter drains into a floor drain. Moisture condenses on the cold filter sump and is drained away, reducing cold cellar humidity. That part actually works.
What I overlooked is the pressure tank, also condenses a lot of water. What I should have done was install a drain pan under the pressure tank to capture and drain away its condensation. Unfortunately now that the tank is installed that is not feasible.
Greenhouse Solar Batch Heater
We have a lean-to attached greenhouse. I’ve documented the environmental control system on my site. Two 30-gallon tanks are mounted high on the rear wall acting as a solar batch heater.
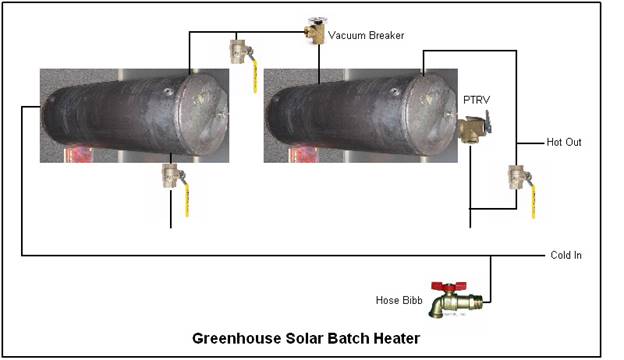
 Greenhouse
provided a convenient location to install a passive batch water heater. Batch
heaters are simply water tanks heated directly by the sun. Normally they
are mounted in a sealed enclosure to maximize temperature gain. I did not have
enough room for an enclosure so mounted a couple of 30 gallon tanks, painted
black, as high as possible on the back wall of the greenhouse. This is less
efficient than putting them in an insulated box. But this allows the tanks to
do double duty; during winter they provide an extra 60 gallons of thermal mass to
help maintain nighttime temperature.
Greenhouse
provided a convenient location to install a passive batch water heater. Batch
heaters are simply water tanks heated directly by the sun. Normally they
are mounted in a sealed enclosure to maximize temperature gain. I did not have
enough room for an enclosure so mounted a couple of 30 gallon tanks, painted
black, as high as possible on the back wall of the greenhouse. This is less
efficient than putting them in an insulated box. But this allows the tanks to
do double duty; during winter they provide an extra 60 gallons of thermal mass to
help maintain nighttime temperature.
To support the tanks used heavy aluminum angle iron bolted to the wall and ¾” plywood cut to cradle each tank. 30 gallons of water weighs 250 pounds plus the weight of the tank, don’t want them falling down. In earthquake country will need some sort of restraint to hold the tank in place as the building shakes.
The tanks are painted black to maximize solar gain using ordinary black paint. There is special paint designed for batch heaters that not only maximizes absorption but minimizes heat being radiated back out of the tank. Since I wanted to use the tanks for winter thermal mass opted not to use special paint.
PTRV
 A Pressure
Temperature Relief Valve (PTRV) valve is plumbed into the “hot” tank. It dumps
water if the tank overheats or experiences excessive pressure. If water is completely
shut off to the greenhouse and PTRV opens there is a possibility of creating a
partial vacuum as the water cools, potentially collapsing the tanks. A vacuum
breaker is installed on the pipe connecting the two tanks. It opens letting in
air if the tanks are depressurized.
A Pressure
Temperature Relief Valve (PTRV) valve is plumbed into the “hot” tank. It dumps
water if the tank overheats or experiences excessive pressure. If water is completely
shut off to the greenhouse and PTRV opens there is a possibility of creating a
partial vacuum as the water cools, potentially collapsing the tanks. A vacuum
breaker is installed on the pipe connecting the two tanks. It opens letting in
air if the tanks are depressurized.
 Hose Bib
Since I needed to supply cold water to the batch heater it was a simple matter of extending the cold water feed to a ¼ turn hose bib for plant watering. A coiled hose makes it easy to reach all the greenhouse plants.
Operating Modes
The three ball valves and two ¼ turn boiler drains, located in the basement, allow flexible control of the batch heater.
· Mode 1: during summer the bypass valve (1) is closed and the feed (2) and return (3) valves open. This causes water to flow through the tanks as hot water is used.
· Mode 2: during winter the bypass valve (1) is open as is the feed valve (2), the return valve (3) is closed. This bypasses the batch tanks but leaves water to the greenhouse turned on for plant watering.
· Mode 3: is used to drain the system. The bypass valve is open (1) and feed (2) and return (3) valves closed. The two boiler drains allow air into the feed and return lines so they can be purged.
Freeze Protection
During normal operation the greenhouse temperature is maintained well above freezing. However, during ice and snow storms we can experience extended power outage lasting several days. Without electricity we lose well water. There is a door between the greenhouse and basement. It is near the wood stove so unless it is extremely cold leaving it open prevents temperature from falling below freezing even without power. To be safe in extreme weather the system is designed to be drained. Pipes slope toward drain valves and the tanks can be emptied.
The tanks are higher than the feed pipes from the house. This means the tanks must be drained first and then the pipes into and out of the house can be drained. To drain the system the bypass valve (1) is opened and the two feed valves (2) (3) are closed. This isolates the solar batch heater from the rest of the house.
Next: the hose bib on the East greenhouse wall is opened releasing pressure. The valve on the tank interconnect pipe is opened letting air into the system and the drain valve on the left hand tank (west) is opened allowing it to drain. That drains the left most tank and the cold water feed. Unfortunately the other tank does not have the ability to be drained completely. To drain it the PTRV is opened. This allows all but a couple of inches of water to be emptied. Even if it freezes there is not enough water in the tank to burst it (hopefully). The fill valve on the hot water feed is opened draining the hot water feed pipe.
Once the tanks are empty the two hose bibs in the basement are opened. This allows air into the feed pipes emptying them of water. If this was planned in advance a squirt of compressed air removes any remaining water.
Activating
To refill the system the basement hose bibs are closed, as are all the valves in the greenhouse. The feed (2) valve is opened allowing water back into the tank. The bypass valve (1) remains opens and the return valve (3) stays closed. Flow is pretty much unrestricted at this point so at first the well pump low pressure safety feature kicks in turning off the well pump. Need to override this until pressure builds up in the tanks. Once pressure in the tanks is high enough the valve in the hot feed in the greenhouse is opened to let out trapped air allowing the tanks to complexly fill. Once all the air is purged the bypass valve (1) is closed and the return valve (3) opened routing water through the solar batch tanks. There is still a little air in the system but that quickly works its way out as hot water faucets are opened.
BTUs Gained – KWHs Saved
Batch tank water easily reaches 90F on sunny days even in mid-March. Well water temperature varies from a low of 45F in the dead of winter to high of 55F by end of summer. The electric water heater is set to 120 degrees. Just reaching normal summer daytime greenhouse air temperature of 90 degrees reduces energy consumption by half.
It takes 8.33 BTUs to raise 1 gallon of water 1 degree F.
Well water entering batch heater is roughly 55 degrees Fahrenheit (12.7C) in summer. Raising water temperature to 90F (32.2 C) takes 17,493 BTUs (90 – 55 x 60 gal x 8.33 BTU).
1 kWh = 3,412 BTU so 17,493 BTU is 5.1 kWh at a cost of $.16kwh each 60 gallons saves $.82
Precise gain varies with time of year, water usage and solar insolation.
Note: in calculating BTUs we are ignoring effect of temperature change on weight.
Solar water heating is effective from about mid-March to mid-November. That overlaps use of wood stove for space heating so the two systems complement each other nicely. During winter solar gain is small and in some cases tank temperature falls below well water inlet temperature overnight. During winter the bypass valve is open and the return valve closed. Water stays in the tanks but is not used for domestic hot water. Water is warmed during the day and gives up heat a night to help moderate greenhouse temperature. It is interesting watching the difference in temperate between the 30-gallon batch heater tanks and the 55-gallon water storage drums we use to moderate temperature. The smaller tanks get warmer during the day and give up more heat over night then the larger drums.
Wood Stove Preheater
Primary heat source is a cordwood stove located in the basement. A heat exchanger in the stove is plumbed to a 30-gal storage tank located behind the stove. Heat is transferred from stove to tank via a thermosiphon loop. As water in the heat exchanger is heated it expands making it lighter so it tends to rise pulling in cold water from the bottom of the tank. As long as heat exchanger is hotter than the tank water keeps circulating.

Heat Exchanger
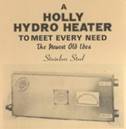 Stove is a
Tempwood top loader (no longer in business). Many years ago I purchased a Holly
Hydro heat exchanger. The heat exchanger is mounted inside the stove just under
the flue opening. The unit is semicustom as the inlet and outlet fittings are
at a right angle allowing them to exit through the rear of the stove rather
than the side. A fitting near the bottom of the storage tank delivers cold
water to the heat exchanger and hot water from the exchanger is plumbed to the
top of the tank.
Stove is a
Tempwood top loader (no longer in business). Many years ago I purchased a Holly
Hydro heat exchanger. The heat exchanger is mounted inside the stove just under
the flue opening. The unit is semicustom as the inlet and outlet fittings are
at a right angle allowing them to exit through the rear of the stove rather
than the side. A fitting near the bottom of the storage tank delivers cold
water to the heat exchanger and hot water from the exchanger is plumbed to the
top of the tank.
When I first installed the system used a swing gate check valve in the thermosiphon loop. There is not much force moving the water so even this type of check valve created too much resistance dramatically impacting performance so I removed it. Reverse flow through the heat exchanger has not been a problem.
Storage Tank
The tank is plumbed into the cold water inlet of the electric water heater. When hot water is used water entering the electric heater is warmer than if water was coming directly from the well reducing need for electricity.
The tank did not have a dip tube so I fashioned my own by soldering a length of ½” pipe inside the ¾” cold water inlet fitting. The dip tube extends almost to the bottom of the tank so cold water enters the bottom and hot exits the top.
The tank has a fitting at the bottom allowing it to be drained. Before I installed the sediment filter sand would collect as it settled out over time. I installed this part of the system before I discovered the benefit of using ¼ turn hose bibs. The drain valve is an ordinary globe valve. I cover the opening with a hose cap when not in use to protect against leaks.
To reduce heat loss tank is wrapped in fiberglass insulation.
PTRV
A PTRV is located on the hot thermosiphon inlet to the storage tank.
During cold spells and low water usage the PTRV opens dumping excess hot water. Having worked hard cutting/splitting/stacking cord wood I wanted to limit this waste. When I installed the system the most convenient location for the PTRV was in the thermosiphon hot water inlet on the side of the tank. This makes the system sensitive to temperature spurts when water temperate is high. If I ever rework the plumbing intend to relocate the PTRV to the hot water outlet at the top of the tank. With the PTRV located there it will still respond to a dangerous over temperature condition but will be less sensitive to surges from the heat exchanger.
Unlike the greenhouse batch heater the preheat tank is never completely isolated from the house plumbing system so a vacuum breaker is not required.
Electric Water Heater
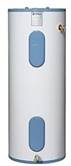 Water heater
is 55 gallon, 240 volt with interlocked dual elements. Because electric water
heaters do not require a flue standby losses are very low, assuming adequate
insulation. We have had good luck with Sears’s water heaters. This one is a
Power Miser 12 with 3” of foam insulation.
Water heater
is 55 gallon, 240 volt with interlocked dual elements. Because electric water
heaters do not require a flue standby losses are very low, assuming adequate
insulation. We have had good luck with Sears’s water heaters. This one is a
Power Miser 12 with 3” of foam insulation.
This is our second Sears unit. I installed it 2008 when I added the circulate pump. Previous heater was 16 years old and while it had not started to leak decided it was a good time to replace it. My son and I cut old one open and it was still in good shape. There was only a little surface rust around the heating element flanges.
Anode Rod
Water heaters come equipped with one or two anode rods. Anode rods are made of magnesium or (lower cost) aluminum. The rods are more reactive then the steel of the tank and slowly corrode protecting the tank. If the rods are replaced before they are completely consumed the tank should last virtually forever. However no one, myself included, are very good about anode rod preventative maintenance.
PTRV
A PTRV protects the tank in case thermostat failure causes overheating.
Emergency Cutoff
 Electric
water heaters have a resettable high temperature thermostat in addition to the
heating element thermostat. If water temperate exceeds maximum thermostat
setting of 160F it trips cutting off power to the respective heating element.
During periods of extreme cold and low water use water may exceed that
temperature causing thermostat to trip. The event will probably go unnoticed
for a while as the wood stove is making lots of hot water during cold weather.
However once weather warms up water temperature will be too low.
Electric
water heaters have a resettable high temperature thermostat in addition to the
heating element thermostat. If water temperate exceeds maximum thermostat
setting of 160F it trips cutting off power to the respective heating element.
During periods of extreme cold and low water use water may exceed that
temperature causing thermostat to trip. The event will probably go unnoticed
for a while as the wood stove is making lots of hot water during cold weather.
However once weather warms up water temperature will be too low.
The overtemp thermostat has a red reset button. To restore operation need to remove the access cover and press the reset button. Typical residential water heaters have two elements one at the bottom and a secondary at the top. The one on the top is only energized during periods of high water use when water temperature gets too low. “Cold” water from the preheat tank enters the electric water heater tank from the bottom via a dip tube, so that ends up being the hottest part of the tank. Some heaters have ECOs on both thermostats some only at the top of the tank.
Maximizing Winter Energy Capture
 To capture
more energy and minimize how often the preheat tank PTRV dumps excess hot water
I installed a small circulator
pump plumbed between electric water heater hot-water outlet and pre heat
tank cold water inlet. One of the functions of the wood
heat controller is to monitor preheat tank temperate to control the pump.
The pump is specifically designed for high temperature applications.
To capture
more energy and minimize how often the preheat tank PTRV dumps excess hot water
I installed a small circulator
pump plumbed between electric water heater hot-water outlet and pre heat
tank cold water inlet. One of the functions of the wood
heat controller is to monitor preheat tank temperate to control the pump.
The pump is specifically designed for high temperature applications.
When water in preheat tank reaches set point temperature the pump circulates water out of the 55-gallon electric water heater back to the cold water inlet of the preheat tank thus lowering preheat tank temperature. This increases total hot water storage capacity from 30 to 85 gallons. A side effect of lowering preheat tank temperature is increased energy capture from stove. A check valve prevents water bypassing the electric water heater.
Using the electric water heater for additional storage increases thermal storage capacity by about 50%. We rarely have a situation anymore where the preheat tank PTRV dumps excess hot water. Part of this is also a lifestyle choice. Knowing we have lots of hot water becomes a good time to do a little extra laundry.
The only significant cost of using the electric water heater to increase storage capacity was $170 for the high temperate pump and a small amount of electricity to run it.
Operating Modes
Two valves determine if water is routed directly to the electric water heater (1) or through the preheat tank (2).
The wood stove controller automatically turns on the recirculate pump as needed.
Activating
Preheat tank and water heater are normally never drained. If either tank is drained when the system is turned back on the pressure switch low pressure cutout needs to be manually overridden until pressure builds up. Air is easily bled by opening one or more hot water faucets.
It is important to turn off water heater electricity when draining the tank or the elements will overheat and burn out.
BTUs Gained – KWHs Saved
Well water entering preheat tank is roughly 45 degrees Fahrenheit (7C) in winter. Raising water temperature to 160F (71 C) takes 28,738 BTUs (160 – 45 x 30 gal x 8.33 BTU).
Electric water heater is 55 gallons set to 120F (49 C). Increasing water temperature to 160F takes 18,326 BTUs (160 – 120 x 55 x 8.33 BTU).
It takes 8.4kWh to raise 30 gallons to 160F at a cost of $.16kWh each tank of water heated by the stove saves $1.34. Adding the 55 gallons from the electric water heater saves another 5.4kWh for $.86. Actual savings of course depends on stove operating time and water usage.
System Operation and Controls
As described both the solar batch and wood preheater can be activated or deactivated as needed. The wood preheat tank is fairly well insulated so even if it is left in the system during the summer overall performance is not significantly degraded. Besides the ability to tune the system for seasonal operation being able to isolated parts of it comes in handy in case of leaks.
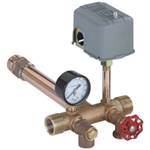
Tempering Valve
 Water
temperature above 120F presents a scald
risk. During winter water temperature from the preheat tank often exceeds 120F.
During periods of extreme cold and low use water can exceeds 160F. A tempering
valve mixes cold water to reduce temperature to safe levels.
Water
temperature above 120F presents a scald
risk. During winter water temperature from the preheat tank often exceeds 120F.
During periods of extreme cold and low use water can exceeds 160F. A tempering
valve mixes cold water to reduce temperature to safe levels.
There is some controversy about using high water temperature to prevent Legionnaires disease. While this is effective preventing the disease it also represents a scald hazard and increases standby loss. The good news is because electric water heaters do not have a flue standby losses are very small with a well-insulated tank.
|
Temperature |
Time to produce 3rd degree burns on adult skin |
|
160 F (71 C) |
½ second |
|
150 F (66 C) |
1.5 seconds |
|
140 F (60 C) |
5 seconds |
|
130 F (54 C) |
30 seconds |
|
120 F (49 C) |
>5 minutes |
|
100 F (38 C) |
Safe Temperature |
Temperature Monitoring
The programmable logic controller (PLC) in the greenhouse is used for water heating monitoring. Four of the eight temperature channels are used to monitor various stages of the hot water system. The greenhouse controller runs 24/7 making these readings available to any PC in the house. This is a monitor only function, the greenhouse controller does not do anything with the temperature readings.
1. Well water temperature
2. Batch solar heater preheat temperature
3. Wood stove preheat temperature
4. Electric water heater temperature
Except for the batch heater temperature is monitored by external probes clamped to the pipe. With the batch heater I had an unused fitting so in that case the probe is in direct contact with the water. For the well and wood preheat tank this external measurement arrangement does not introduce too much error because even though the probe is external it is still in close proximity to the tank. The water heater is a problem as the tank is insulated with 3” of foam so the sensor is far away from the tank. When water is being used readout is accurate to a few degrees as the flowing water heats the pipe. If water is not being used temperature can drop by as much as 30F as the pipe cools.
The wood stove preheat tank ended up with three temperature sensors. One for the greenhouse and two for the wood heat controller, one of which feeds the front panel temperature display and the other is used by the programmable logic controller to switch the pump on/off.
Active Control
While the system is designed to be passive active control is used to maximize winter hot water production. To increase water production and prevent the need to dump overheated water the wood heat controller monitors preheat tank temperature to determine when to turn on the circulate pump. The pump expands storage from just the 30-gallon preheat tank to 85-gallons, preheat and electric water heater tank. Whenever the pump is running the system turns on an LED indicator.
If neither the greenhouse nor wood stove is able to provide 120F water normal electric water heater operation takes over to increase temperature to an acceptable value.
Where to Find Materials
I purchased most of the major items from scrap metal or surplus dealers.
Ø The ideal tank material is either stainless steel or copper. Unfortunately both are extremely expensive. Solar Components here in NH used to sell a purpose built 30-gal batch solar tank for $350. But it is no longer listed on their web site. We have had good luck with Sears Power Miser Electric water heaters. I assume the only difference between warranty periods is the amount of insulation and number of anode rods. Sears web site lists a 30-gal tall electric water heater for $280. Might be able to pick up a damaged unit for less. Seems like a waste to buy an entire water heater and throw away the controls and insulation but that is the power of mass production vs. specialty.
Ø I purchased the Little Giant CMD-100-3B hot water pump from Surplus Center. It is rated to 212F and has been in trouble free use for years. It appears to be discontinued. Any small hydronic heating system circulator pump would be a suitable replacement.
Ø The heat exchanger came from Holly Solar Products. They are still around but have moved on to LED lighting. Therma-Coil makes a stainless steel heat exchanger that can be installed in most wood burning stoves but I have no experience with the company.
Ø Water Heater Rescue is a good source for anode rods, dip tubes, and anything water heater related.
Ø I purchased the filter housing, accessories, and filter elements from Waterfilters.net. They have a bunch of great educational videos pertaining to water quality issues.
Ø Most of the plumbing fitting came from Plumbing Fittings Direct or our local plumbing supply house.
Cost and ROI
I do not have an accurate cost rollup as the system has evolved over the years and many of the components came from scrap and surplus dealers not easy to duplicate. That being said here is a cost estimate to implement the system using new components.
|
Qty |
Item |
Pt # |
Vendor |
Price |
Extended |
|
3 |
30 gal tank |
32636 |
Sears |
$280 |
$840 |
|
1 |
Heat exchanger |
|
Therma-coil |
$130 |
$130 |
|
1 |
Pump |
CMD-100-3B |
Little Giant |
$170 |
$170 |
|
8 |
Ball valve |
|
|
$7 |
$56 |
|
3 |
¼ turn boiler drain |
|
|
$6 |
$18 |
|
2 |
PTRV |
100XL |
Watts |
$25 |
$50 |
|
1 |
Tempering valve |
70A |
Watts |
$50 |
$50 |
|
1 |
Vacuum breaker |
288A |
Watts |
$25 |
$25 |
|
|
Misc. plumbing |
|
|
|
$200 |
|
|
|
|
|
|
------------ |
|
|
|
|
|
Total |
~$1,500 |
There is nothing magic about the 30 gallon tanks; I used them simply because that is what I was able to find for cheap. For solar they work well, small diameter means lots of surface area exposed to the sun. The wood preheat storage tank has the opposite design requirement. A large diameter tank has a smaller percentage of surface area relative to volume so standby heat loss is reduced. A larger tank might have eliminated the need for the recirculate pump. However a larger tank also means lower water temperate for the same number of captured BTUs.
Winter/summer energy reduction in electricity usage is about 4 kWh per day (1,460 kWh per year) at an electricity rate of $.16 kWh the system saves $.64 a day, $234 a year. If we assume system cost of $1500 yields a simple payback of 6.4 years.
This neglects additional wood we burn to heat water in winter. We harvest cordwood on our property so I tend to ignore the addition wood consumption. If we assume about half the hot water is generated in winter that is about 2.5 million BTUs. A reasonable estimate for hardwood energy content is 27 million BTUs per cord. With a stove efficiency of 60% it comes to an extra 1/8 of a cord per year. At a price of $250 per cord that reduces savings by $30 a year pushing payback out a year to 7.4 years.
Parts of the system were installed almost 30 years ago so it has proved to be a profitable investment.
Water Heating Rate
Check your local electric utility to see if they have special water heating rate or off-peak discount. Ours has both but there is a monthly charge for the separate meter. Need to factor in total cost to see if a special rate is worthwhile. Off peak rates are especially attractive when using solar as the peak period, when power is shut off, coincides with maximum solar intensity. However in our case the extra cost for the time of day meter is so high and we use so little electricity the rate is not cost effective.
Propane and Natural gas are options. In our location natural gas is not available and propane is nearly as expensive as electricity and requires a vented water heater.
A Word about Valves
Ball valves are much preferred for shutoffs and hose bibs. They are less likely to leak and provide unobstructed water flow. If you chose not to use quarter turn hose bibs for drains I strongly suggest getting hose caps and use them to seal the valve as a precaution against leaks.
Draining & Testing Made Easy
 Using hose bibs
rather than ball valve drain fittings makes it easy to use compressed air to
blow out the system. I made up a simple adapter consisting of a washing machine
hose, valve and quick connect air fitting. I used an old globe valve to adapt
hose connection to pipe thread. Works great for blowing water out of the
system. It also came in handy when I was building the various systems as I
could pressurize them with air, rather than water for leak testing.
Using hose bibs
rather than ball valve drain fittings makes it easy to use compressed air to
blow out the system. I made up a simple adapter consisting of a washing machine
hose, valve and quick connect air fitting. I used an old globe valve to adapt
hose connection to pipe thread. Works great for blowing water out of the
system. It also came in handy when I was building the various systems as I
could pressurize them with air, rather than water for leak testing.
Parting Thought
It has been very satisfying tinkering with and improving the system over the years. It is nice knowing we are doing our bit to conserve energy and save money at the same time.