|
Schmidt Consulting |
|
Vacuum Cleaner Connector Repair Hack |
|
|
|
|
|
Tom Schmidt |
|
Revised 6/26/2017 |
http://www.tschmidt.com/
|
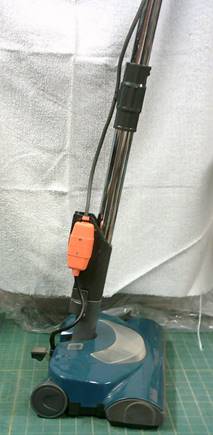
We have Sears Kenmore canister vacuum cleaner that has served us well for years. Unfortunately there is a design flaw that causes the electrical connectors to overheat and fail. To extend the life of the unit hacked up a replacement connector for the power head. |
The Kenmore canister vacuum is a very handy device that comes with a number of attachments. In order to make usage as convenient as possible there are captive electrical connectors at each disconnecting point. While the idea is great the implementation leaves something to be desired. The connectors tend to overheat rendering the device useless. I hoped the problem was a one off with ours but in looking at other units to cannibalize found it is an all too common problem. The connectors themselves look adequate for the job so I assume vibration is the culprit.
|
|
|
|
|

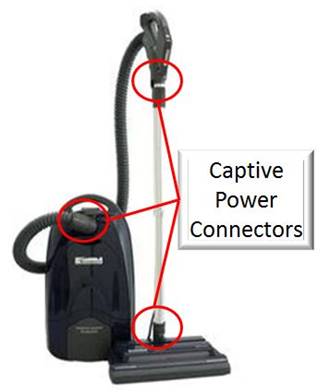

There are three connectors on the hose and wand. Luckily for us the only one that had overheated was the one for the power head. It would have been much more difficult to hack the other two.
Initially I thought about using an ordinary NEMA 2-pin 1-15 plug and socket. However US plugs are not shrouded so I was worried about possible shock hazard if the plug is misinserted. I found a high current 2-pin connector on eBay that meets British BS 5733/A safety standard. This is a shrouded connector with round pins and strain relief eliminating the risk of shock hazard. The mated pair was about $6 US delivered.
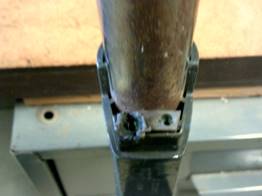
The female power head connector is clipped to the bracket. I
could not figure out how to remove it so drilled out the female pins to salvage
as much cordage as possible. That way I did not have to splice in a new cable.
The new connector back shell is attached to the guts with a single screw. I
removed the screw on the female connector and using the hole as a guide drilled
through the other side of the back shell. I positioned the receptacle on the
side of the plastic bracket used for the old connector and drilled 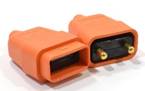 a mounting hole. There is no clearance between the back shell and the
connector itself so I used a 6-32 flat head screw and really torqued it down so
it was flush with the inside of the plastic back shell. A little filing cleaned
up the plastic swarf displaced by the screw. Connected the cable and clamped
down the strain relief.
a mounting hole. There is no clearance between the back shell and the
connector itself so I used a 6-32 flat head screw and really torqued it down so
it was flush with the inside of the plastic back shell. A little filing cleaned
up the plastic swarf displaced by the screw. Connected the cable and clamped
down the strain relief.
To prevent the connector from rotating drilled a couple of holes in the bracket where the cord exits and used a cable tie to secure it. Not elegant but gets the job done.
Opened up the power head and replaced the existing plug cable with some SJ cable that was about the same O/D and threaded it through the molded strain reliefs. For a little extra protection slipped a length of heat shrink over the cable where it exists the power head. Attached the plug and we were good to go.
Attaching and removing the power head is now a two-step operation: connect to the vacuum pipe and then the electrical connector. Other than this slight inconvenience the unit is as good as new.
|
|
|